

How To Use Boot Animations App Flashable Zip
Boot animation is the beginning thing you stare at when yous power ON your Android device, so what'due south a Dominate Android without a BOSS kicking animation ? 😀
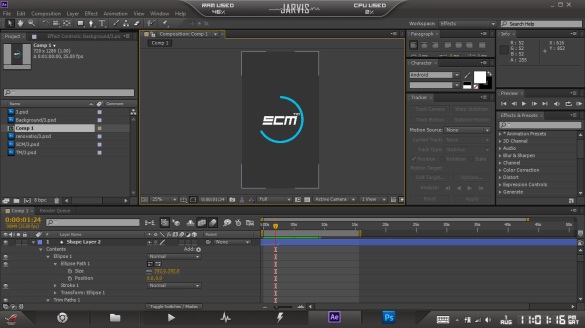
Here's an instance of what I created.
This is a tutorial on how to create boot animations from scratch using Adobe AfterEffects.
You lot could likewise apply whatever of these culling methods and proceed to Stride 2.
- Convert a video into kicking animation [ here ]
- Catechumen a GIF into boot animation [ here ]
- Use a static prototype equally kicking animation
Step 1 : CREATE YOUR BOOTANIMATION
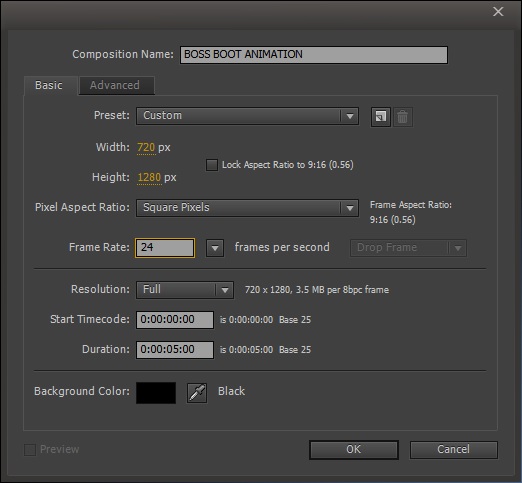
Figure out the screen resolution of your Android. Create a new limerick in AfterEffects with that specific resolution. Set the required duration for the animation.
Create your blitheness. Here'southward a bones guide to animative in AfterEffects.
Here'south the interesting role, the kicking animation is non stored in Android as a video file, rather it is saved frame by frame as prototype files.
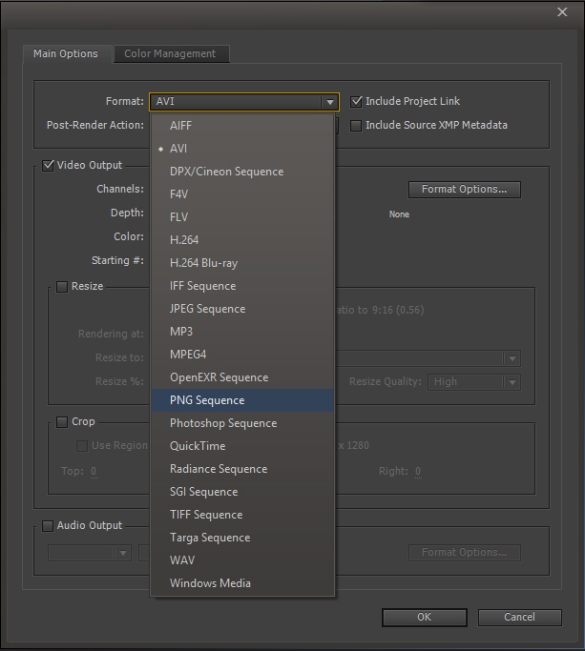
Rendering the composition :
- Set theOutput Module format as PNG Sequence
- Output To a new folder with the naming sequence as[#####].png
Step 2 : PACKAGING THE BOOT ANIMATION
Afterward rendering the composition, the output binder will contain the blitheness stripped downwardly to each frame as PNG images. Rename the output folder to folder1. If you want a part of the animation to loop, put those frames into another binder named folder2. At present place the folder(due south) into some other folder named bootanimation. i.due east :
bootanimation ├───folder1 ( Primary blitheness ) └───folder2 ( Part that must loop )
To packet the kicking blitheness. Download this tool ( Windows binary ). MAC / UNIX users may utilise Vino.
Open the Boot Animation Creator. Choose the folder bootanimation.

Set the properties. Select the kickoff line and click on edit.
Now choose the appropriate resolution and framerate as set in the AfterEffects composition. 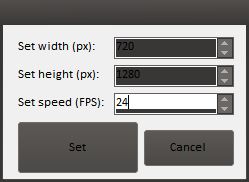
Click on Add loop and cull folder1.

If the number of loops is set to 0, that part will keep looping.
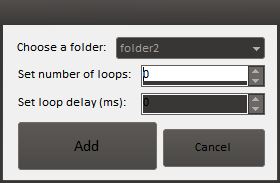
Click on adjacent and salve exactly as bootanimation.zero. Preview the animation using this tool. You lot could also create a shutdown animation, follow the aforementioned steps and save exactly every bit shutdownanimation.zip. But mind yous, shutdown animations wouldn't last as long as boot animations, and so make it short.
STEP 3 : INSTALLING THE Kick Blitheness
There are 3 ways to install the boot blitheness
- Using a root file explorer ( ROOT )
- Using ADB ( WITHOUT ROOT )
- Flashing a new ROM with the kicking blitheness ( RECOVERY )
I recommend not to apply 3rd party apps to install kicking animations!
USING ROOT FILE EXPLORER
I recommend using ES file explorer. Press bill of fare and set Root Explorer ON

Identify the bootanimation.naughtin your phone storage, re-create and replace it with the file in /system/media

Long printing the newbootanimation.niland select backdrop.

Tap on Change next to Permissions and set it like this

You're done ! Reboot the device to view the new boot animation.
USING ADB
Navigate to your adb binary folder and place thebootanimation.nil fileat that place. Hold shift and right-click, open control window here. ( Here's a noob guide to setting up basic adb )
Blazon the command :
adb push bootanimation.null /information/local adb reboot
FLASHING A NEW ROM WITH THE Kick ANIMATION
Open up upwardly your ROM ZIP file and replace the bootanimation.zippo file present in System > Media and flash the new ROM.
Leave a comment if you take whatsoever doubts. No matter how noob the question is, I'll be glad to help 🙂
Source: https://chandruscm.wordpress.com/tag/how-to-flash-boot-animation/
Posted by: nguyencreformen.blogspot.com
0 Response to "How To Use Boot Animations App Flashable Zip"
Post a Comment